Tuesday, June 29, 2010

Kids Bowl Free


I have been honing my VERY limited bowling skills lately due to the Kids Bowl Free bowling program we enrolled into in May.

Kids Bowl Free is just that! Sign up via the website and all kids in your household can bowl 2 free games everyday through Labor Day. You have to choose a bowling alley for your bowling and print coupons each week for daily use.

You can purchase a family pass for adults up to 6 and can include sitters and relatives as part of your family pass. Shoe rental is extra and times and days may vary slightly.

My high scores so far have been 151 and 159. My low scores are in the 70's where I only beat my 4.5 year old by just a few pins.

Great time and a low cost family activity. Visit Kids Bowl Free for more info and to sign up for bowling fun!

Monday, June 28, 2010

Batik Patriotic Pillows

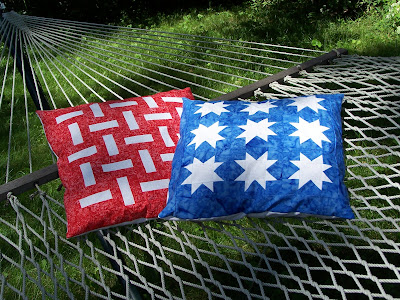
So I have had these pieced pillows on my mind for a few years now and finally decided to put them together. A stars and stripes pillow pair for the fourth of July, I chose bright batik prints over dark traditional colors and am super pleased with the outcome. These pillows have an upcycled twist as I used white oxford shirts for the backing.

Here are some basic instructions to making a set for yourself, or at least think about making, and tips on using a shirt for a backing.

100% Quilting cotton Batiks, and a white print on print

Fabrics, I used a red, white and a blue (really did I need to tell you that)? You could do this in Christmas colors, or fall colors or whatever, versatile enough for lots of occasions.

You will need, fabric, thread, sewing machine, rotary cutter, old shirt or backing fabric same size as pillow fronts. Use 1/4 inch seams throughout, this is very important for accurate piecing and getting your pillow fronts the same size. Instructions assume some quilting and sewing experience, questions just let me know or post and I will do my best to answer.

Fabrics:
  • Red - 3/8 yard
  • White - 1/2 yard
  • Blue - 3/8 yard
About the blocks: The blue and white Sawtooth Stars, traditional quilt block that is easy to stitch, and the red and white stripes is a variation on a rail fence, though it is a bit harder to see the rails as I used 2 fabrics instead of three, which you usually see in rail fence.

Blue and white sawtooth stars:
Blue Fabric: 36 @ 2 x 2 inches
36 @ 2 x 2.5 inches

White Fabric: 9 @ 2.5 x 2.5 squares
75 @1.5 x 1.5 squares

Making the star points, assemble by sewing corner to corner 1.5 inch white square to a 2.5 x 2 inch rectangle, trim, iron and sew a second 1.5 inch square to make a flying geese, you will need 4 of these to make a single star. Make 9 star blocks, sew together.

Assemble in rows

Completed block

Red and white Rails:
Red Fabric: 6 @ 1.5 inch x width of fabric (WOF)
White Fabric: 3 @ 1.5 inch x WOF

You will need to make three sets of the red and white strips, do this by sewing red to white, then another red. Your strip width should be 3.5 inches, this is important to be accurate as you will then trim your long strips down to 3.5 x 3.5 squares. Once trimmed use 20 to create the pillow, rotate and sew blocks as shown.

I have some throw pillows and just decided to cover those for the season rather then buy new, this meant I was a little short on the front. To make up the difference I just added a border to each side, just measure your top and pillow and add your border, be sure to take in 1/4 seam allowance for the top, and the sewing the back to the front, for me this meant a 2.5 inch border on all 4 sides.

Completed blocks

Using an old shirt for the backing. Great way to use and old shirt, this was the first time I did this so I will share what worked and well, what did not work.

Lay your pillow front on shirt place, cut, trim

Be sure the shirt front is as big and a little bit bigger is better then your pillow front. Cut the front body of the shirt from the back, you may need to use the seam where the sleeve is as part of the backing if your pillow is too big to do from the sleeves down. The first one I cut out I trimmed away the sleeves, the result was the pocket was sewn closed and the buttons were awkwardly placed on the back, it worked but I like the pocket to show fully and the buttons to be placed somewhat centered and functional on the back.

Next lay your pillow on the shirt, using your rotary cutter cut the shirt to the same size as the pillow. Pin right sides together and stitch around all 4 sides, be sure to open buttons prior to sewing so you can flip your pillow right side out.


Shirt before trimming, you can see full pocket and sleeve seams

Completed back of pillow, buttoned close and can be removed easily


I plan on sewing some red and blue star buttons on and will show those off when done, first I have to find them.

Now you have some pillows to kick back and relax on the fourth, think I will be spending some time with these in the hammock, well I hope!

Monday, June 14, 2010

Strolling Cranbrook Gardens


We have had such a moist spring this year that the gardens are lush and exquisite. It was an overcast day which really made the bright flowers stand out next to the endless greenery.


Wednesday, June 9, 2010

Carabiner Happy Day


Silly when supplies make you giddy, but you know how it is acquiring anything to create. I had introduced carabiner coin purses last fall just on a whim when I found some carabiners in a back to school section at the corner drug store. Little did I know I would become obsessed with tracking these little gems down and I would have a good selling accessory to add to my etsy shop.

Then I found them attached to little calendars at Michaels, I found myself driving around to various locations gobbling these up in various colors. What I loved best about these ones they had great colors for my fabric collection. I sort of lost count but had purchased over 150 of these and recently have been very selective in using them for my creations. This also meant the hunt was on again.

I found a few supplies online and got a fresh new batch to help me create and restock my carabiner section in my shop.

Mini Carabiner Coin purses 4.75 x 3.5 inches


Larger Carabiner Coin Purses 6 x 4.5 inches

With my new batch a new size as well, this size is about an inch wider and taller then my minis and will hold the i-pod. I also hope to get more boy inspired prints to add as well because we all know they sort of get left out of purses and totes.

Thursday, June 3, 2010

Memorial Day Weekend


It was amazing here in Michigan over the holiday weekend, literally one of the best I can ever recall. Summer like temperatures meant grilling out every night, windows open and out and about.

We went to our city's museum, which is really 2 houses located at a park. It was nice to finally go to this attraction and see some local history. I was surprised how little there was considering the length of time our city has been establised (1832) and how active and relevant our downtown area still is.

I managed to take this picture on the grounds of the museum as we strolled the park and took in the beautiful start to summer.

Wednesday, June 2, 2010

Leon and Lulu Artists Market

I recently did my first juried show, at a local furniture and accessory store called Leon and Lulu. This is a quarterly show that is quite unique both in its setting and in the selected artists. The show is always held Sunday and Tuesday of the given weekend and is attended by hundreds of shoppers, each event also supports a local charity.

Leon and Lulu is a destination type of store the kind you could wonder around several times and still not see everything. One of a kind artwork, furniture and accessories all in a renovated roller rink, complete with hundreds of pairs of roller skates. You will also find a sweet big dog named Spot wandering around as well, he is especially keen to make friends with you if you happen to grab a bag of popcorn from the snack bar.


I had a great time during the show, the in person feedback I get is always helpful to get new ideas or tweek old ones. I also met several local artists/crafters and hope to keep in touch with them to share ideas and events in the future.

I had a great space to set up, in dining room display, so I had a large table, a buffet, and next to me was a bed with a sofa table, so I had lots and lots of room to spread out, I also brought a grid wall for my purses.

I had prepped two new offerings for the show, what I call "Accessory Ensembles" these were coordinated groupings of...accessories. I had large ones which started with a cosmetic pouch and had varying coordinated accessories like change purse, tissue cozy, pocket mirror, eyeglass case, key chains, hair accessories, mini composition books. I was super happy with the presentation which was simple crunchy cello bags, each labeled with contents and pricing, they looked really pretty and colorful when displayed. The pricing for these was 20.00-30.00 each. These did not sell as well as I had hoped BUT got lots of attention, I think if it were closer to a gift giving time like Christmas or Mothers Day they would have sold more, I would do more of these in the future.

I had then done "mini accessory ensembles" that were just a three piece set, many with a mini coin purse, pocket mirror and tissue cozy, each presented in a tulle drawstring bag each were $12.00. I had made over 35 of these and had less then 10 left, and got lots and lots of positive comments on these as well, I think closer to the holidays these will be a huge hit, I would bring even more next time.

Other items I had were carabiner coin purses which are a great seller for me in general and a personal fave of mine too. I sold lots of pocket mirrors, eyeglass cases and jumbo paper clip book marks. I had several requests for card cases and tea cozies and would definitely add these to future shows.

All in all my first Leon and Lulu show was a success, I plan to re-apply for a fall show and take all that I learned from this one and improve for the next.

Related Posts with Thumbnails