
Aqua Love
Thanks to etsy shop designsinbeads for this feature.
Teal and Gray
Thanks to etsy shop XOXOPaperGems for this feature.
Thursday, April 28, 2011

Tuesday, April 19, 2011
Candied Meatloaf
 I was never much of a fan of meatloaf, childhood memories of this appearing often pretty much kept me away from it for a good amount of my adult life. Until I discovered this meatloaf that is so flavorful it shows up on our table once in a while. For me anything with ground beef that is the main ingredient, using a quality beef is key. Surprise ingredients of brown sugar and ketchup makes this a winter hit. Like any meatloaf recipe the ingredients can be altered to taste.
Preheat oven to 350 degrees.
- 1/2 cup packed brown sugar
- 1/2 cup ketchup
- 1.5 pounds ground beef
- 1/4-1/2 cup milk
- 2 eggs
- 1 tsp salt
- 1 small onion finely diced
- 3/4 cup crushed saltines
- garlic to taste
2. Press brown sugar into bottom of pan, top with ketchup.
3. Mix remaining ingredients in bowl, cover sugar and ketchup with meatloaf
4. Bake 1 hour 15 minutes to 1 hour 30 minutes, remove from oven let sit for 10 minutes, slice and serve, use pan drippings as a sauce at the table or spoon over slices.
Since I think it is an unwritten law that you serve mash potatoes with meatloaf just a few quick notes about this yummy side dish.
 Peel and wash potatoes, I usually figure about 1.5 potatoes per person as a start. I boil them in water with either a can of chicken broth or a few boullion cubes, sometimes to this I will add garlic, either fresh or from the fridge.
Boil until potatoes will pierce easily with a fork. Drain, return to pan and beat, I use a hand mixer but a potato masher is aok too. I start with at least 3 TBLS of real butter, 1/4 cup of milk and about 1 tsp of salt. I top with a smidge of butter and a sprinkling of dried chives.
 Since winter has stuck around this year, way past its welcome this was a warm and comforting meal. The meatloaf will have a wonderful sauce in the bottom of the pan, spoon over the slices. Great recipe even the kids will love, paired with some fresh green beans.
Friday, April 15, 2011
My Shipping Department
 Ok, maybe that is an exaggeration but since my sewing room makeover I actually have a dedicated shipping station. This is such a huge improvement over my former shipping department which was scattered over a lot of my first floor.
This was how I USED to ship items:
Item needs to be shipped, run upstairs get items (this is actually still the same) bring to sewing room to iron, lint roll as needed.
Off to the office to print postage, then find packaging, sometimes this was on my desk in the office, in the hall closet, in the closet on the bookshelf, in the basement, in the dining room. Really this was a nightmare tracking down an envelope, peanuts, tissue, boxes.
Move with packaging and item to the dining room to complete wrap up. I did make a little box for thank yous, business cards, blank cards, I also kept my tissue and this box on part of my kitchen counter, actually more of an island between my kitchen and my dining room, it is a large space so for the most part it was out of the way. Yet it was tiresome to look at and it always had to be moved for company, which more opportunity for things to get lost.
Oh, the tape, now back to the office, or the hall shelf, or in the kitchen drawers, and pens those like to wander too.
Seriously this was about how I did things for 4 years, sometimes better then others.
Now, I have a 5 shelf bookshelf JUST outside my sewing room, this has always been there but was really just a dumping ground between me and my husband. I have dedicated 2 full shelves to all my shipping supplies.
 What I keep on hand:
- envelopes, priority, small, bubble and so on. I have a few old plastic book racks that divide and sort them, I keep the overflow in the basement on a dedicated shipping rack.
- My tissue paper and packaging peanuts (just a few of these)
- Thank you notes, blank cards for gift greetings which is sometimes requested
- I have tape, scissors, lint roller, address labels and stamp, pens and scissors that all STAY here
- Local post cards or newsletter of events and such

Shipping has become a lot less stressful and easy to manage.
Thursday, April 14, 2011
Random Wine Review Aconga Cabernet
 Another entry in the good wine under $10.00, my husband said in spite of the $5.99 price tag he only paid $3.50, "nothing but the best". Aconga Malbec - Cabernet Sauvignon from 2010.
 I found this wine quite pleasant and easy to drink DH pretty much puts all wines in the fridge (gasp), anyway straight from the fridge it is a bit too harsh, but pour into a glass and let it air out and warm up a bit it is quite nice. It is not overly dry but you can definitely taste the dry tones of the Cabernet.
I also used this as my wine in chicken cacciatore which called for a chianti or dry wine, this was close enough, though I will say 1/2 cup of this wine was a bit too much.
Wednesday, April 13, 2011
Hideaway Two-fer
 I recently got a piece of this oh so cute Hideaway fabric from Lauren and Jessi Jung, love the little village among the trees. I knew the minute I opened it I needed something for me in addition to the totes I would be making for the shop.
I had seen a table runner from this line so I went in search of that, thinking I would place an order. However I found this free pattern for this window box pillow so I immediately made this for my living room window seat. You can find the pattern for this free pdf pattern here. I followed the pattern dimensions exactly, then quilted the top to some batting as this is how I make all my pillows. I just did simple echo quilting on the brown around all the windows.
 The pattern then called for 9 raw edge yo yo type of flowers. I am not a big fan of raw edge applique and I have pretty much every size of the Clover yo yo makers so I used the large and the medium for mine. It called for 9 of these in the pattern I figured double that would be even more fun, embellish with some buttons and my garden is complete. Now the Two-fer, a matching bookmark!
  Some fabrics are just so cute you cannot even toss the smallest of pieces, so I whipped up this bookmark, a few simple directions below if you want to make one yourself. Sorry about the dark pictures, it was seriously so bright that day but my camera had the wrong setting, I think you can still see.
Leftover pieces of fabric, rick rack and ribbon, a piece of fusible fleece, a 1/4 inch smaller on the length and the width. Trim the corners and a "notch" on one side, about 2 inches long, 1/4 inch deep.


Tuesday, April 12, 2011
A Few Recent Treasury Features
Thanks to etsy shop MagdalinasBoutique for this feature.
Thanks to etsy shop CraftsbyCarrie for this feature.
Thanks to etsy shop Tib44 for this feature.
Monday, April 11, 2011
Refashion Denim Jacket
 What I had intended to be a sort of tutorial is now just a show and tell with a few hopefully "helpful" hints on how to refashion your own denim jacket. I got this jacket for my 5 year old at a mom to mom sale last fall for just $2.00. It was just about brand new, of course these types of jackets can take a fair amount of wear and still look brand new.
 Fabric choices, 1/4 yard of the big flower dots, which was my focal, then coordinating 1/8 yard cuts of compliments and a few yards of rick rack and trims
I also wanted to make a statement type of jacket with a little more grown up girl feel, not super babyish so that was reflected in the color palette. I knew pink and purple would have to be a part of it but also added orange, aqua, lime and aqua throw in some rick rack, buttons, handmade yo yo's and this colorful jacket gets RAVES every time we are out and about. Fun thing about it is we have lots and lots of colorful clothes to go with it.
I used an assortment of fabrics, 1/8-1/4 yard each and various sizes of rick rack 1-1.5 yards each. I really did not have a plan except that I new I wanted to cover the back completely and do some embellishments to the top, and that I wanted to cover the pockets and the placard below the pockets. I still want to add some crystals or hot fix rhinestones to the upper chest portions and maybe the sleeves.
I did lots of measuring and math to get the correct dimensions for the back, I also did this wrong. It was wrong that my math was too perfect to the size I wanted which meant it finished on the heavy seams, since I have an industrial machine this was no problem, but if not there is no way I could have sewn through my fabrics and the seams, so either bigger or smaller by 1/2 inch would be better. I would recommend making paper templates of all pieces, then add your seam allowances to come up with your finished pieces.
Sewing the pieces onto the denim, a form of machine applique:
I made my square for the back then used interfacing, actually I used pattern ease as this is what I had on hand so it had grids which were not a problem, if it were lighter fabrics those might show through. I would recommend a light weight sew in type for this application, I used this on the back piece, the front placards and the squares on the back top detail.
Make your component then sew RIGHT SIDES TO RIGHT SIDES to the interfacing, you can sew it all the way closed because you are going to cut a slit in the center to turn right side out, also trim the corners as needed and poke cleanly, press your piece. Now all your seams are inside and it is ready to be sewn down, I sew as close to the edge as possible to get a clean look to your piece.
 Sew your applique piece right sides together to your interfacing
 Back piece turned, pressed ready to applique
 Sew down to jacket
 Front piece ready to be turned and pressed
 Sew down
 Square for back, fabric to fabric, same method, sew, clip corners, turn and press
 Squares sewn down by machine, yo yo's sewn down attached by hand with a button to help secure
For the pockets I made a paper template, and then built the pocket, this is a "sleeve that has been slid up over the pocket, then sewn down, I seed from the top all the way through the jacket, actually closing the pocket so it is not functional to put anything inside or to snap close.
 Pocket is two pieces of the paper template (in fabric) sewn right sides to right sides, then the top opening is press to encase seams, slide over pocket sew.
 Applying rick rack, for the jumbo I used fray check, then folded it under itself for the bottom trim, I sewed all along the top and bottom edge with a matching thread.
 Thinner rick rack can be just sewn down the center, I used a mono-filament thread on the blue detail.
 Additional detail on the sleeves, a simple tube turned right side out, sewn down
 Pretty much done, I am going to be on the lookout for more bling for the top, but so far it has been a great piece that goes with most of my daughters colorful wardrobe!
Friday, April 8, 2011
Rainy Day Closet Makeover and M&M Cookies
 April showers have definitely hit my part of Michigan, so lots of indoor activities. I have been wanting to paint my master bath closet pretty much since we moved back into our renovated house, um...over 5 years ago. My master bath is one of the highlights of our home renovation, I spent a ton of time working with the builder to make this really special. This bathroom is bigger then the original size of our living room, it is about 11 feet x 15 feet, it is one of those rooms that will help sell the house, but we are pretty much never going anywhere.
Since I am going to try and stock up during sales and do some not so extreme "extreme couponing" I wanted a fresh new space to store these goodies. Our closet while not huge is big enough, we also have in this bathroom 2 huge vanity cupboards, 5 drawers and and a 7 foot linen tower. We have a ton of storage in this bathroom, but the closet was never actually painted, it was primed and we have lived with it like this for the 5 years.
 Before, kind of a random mess

Before.........After
The bath is neutral tones, but our towels and linens are brown and aqua. I had enough paint left from my sewing room that I just used this and the wrong shade of builders beige I got when finding the correct builders beige. I painted the walls the aqua and the shelves the ivory. I added a few brown storage vessles, like planters, baskets and votive holders to keep some items contained. Best thing about this was cleaning out the closet, LOVE that feeling, while not fully stocked it looks 100% better and for only about 1.5 hours of work!Then onto the M&M Cookies! We managed to have several bags of M&M's left over from Valentines Days so I wanted to use these up once and for all. This bag was dark chocolate so we made a simple standard recipe. My 5 year old was actually helpful this time, unlike at Christmas she stuck with it to the end. In fact the funniest part of the cookies is after the first when I offered her a second she said "No, I'm good". Too cute!

Thursday, April 7, 2011
Yellow Door Six Months
 It has been six months since I started Yellow Door, I have also just signed on for another year so I will be there for sure through April 2012. I have been so inspired to be part of such a unique creative community, I have met some amazingly talented and hard working Michigan folks.
I have sold since my time here since November just about 1000 items, the number is actually a lot higher as I have sold lots of items in 3 piece and higher sets, so the number of items made/sold is probably closer to 1500 items. I was genuinely proud of my space today and was almost taken aback that all these items were planned and passed through my hands to be shared with others, maybe it was the sunny bright day but all of Yellow Door looked amazing.
Today I really stocked my booth, I took in some gift sets, (see my post here for Easter packaging ideas for year round) that I hope are well received for upcoming gift type holidays such as Mothers Day, Easter, etc. I filled all my product baskets and removed a few odd single items, below a few updated pictures which shows it fully stocked I can take next week off from stocking which will give me a breather and work to stockpile items for shows and the fall season.

 Inside my booth, top looking left, bottom looking right
 Standing JUST outside my booth, top looking left, bottom looking right
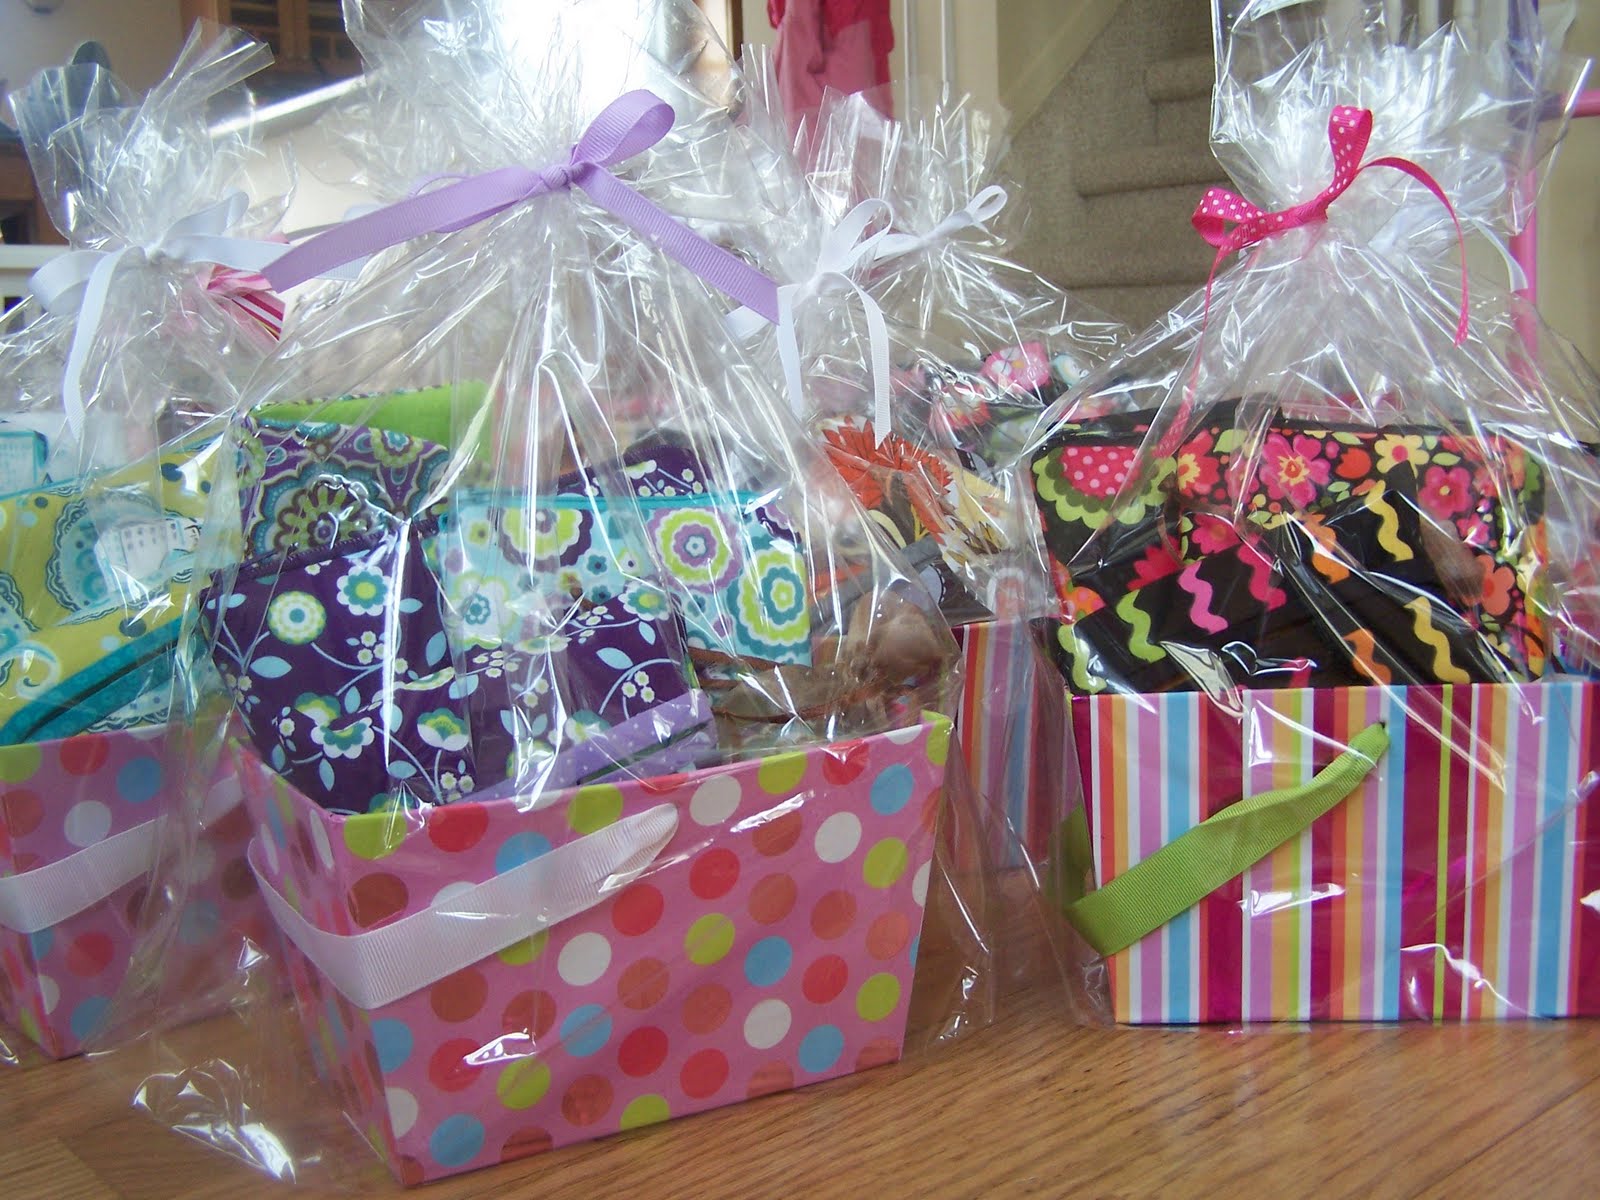 I took a few pictures of my gift baskets, I don't think the pictures do them justice they are simply delicious, so much color and shiny bags and bows, totally gift ready!
Extreme Couponing
Well sort of, not really. But I have become somewhat fascinated with this concept, though not to the extremes as recently seen on TLC new reality show. But the preview for this show got me curious and looking online for more about this.
I really would just like to learn more about sale cycles and using coupons in conjunction with them. After a bit of Googling I stumbled onto a site that to me is more in the real world for most people trying to save on their grocery, home and health and beauty needs. This site is "Southern Savers" there is a ton of good up to date information there along with several YouTube videos to help explain some of the ideas and concepts.
My first attempt to put some of these into practice was at CVS, there was an excellent video on Southern Savers how to use their sales flier, coupons and Extra Care Bucks (ECB). I got Sundays paper and plotted my trip. I will say while I was really happy I did not do as well as I "could" have I learned a lot in the process. I got $125.00 in grocery items for about $46.00, I still have 21.99 to spend in ECB for future purchases. If I had done it all properly via 1 additional transaction I would have only spent about 28.00 for the same amount of goods.
Extreme couponing is also not fresh friendly, we go through tons of fresh fruit and vegetables, I do look for sales and stock up as much as possible when I can so this part of my grocery bill most likely will not change. Also meats, we buy a lot of meat as well, I do have a freezer so I have stockpiled that as well during sales.
So I am learning and applying as it makes sense for my family, it has been a fun learning experience and even my husband is in on it and agrees saving money obviously makes sense.
Subscribe to:
Posts (Atom)


